Before sending us your print label designs, we kindly request you to carefully review them (including spellings), please make sure the guideline layer is turned OFF to avoid misprinting. Making corrections or modifications after the proofing stage may result in additional charges. This is because we would need to repeat the entire pre-press process to incorporate the new files.
Preferred File Formats
• Adobe Illustrator CC 2019 (.ai, .eps or .pdf)
This is preferred because of couple reasons:
- Vector Format: Adobe Illustrator files (.ai) are primarily vector-based, which means they store images as mathematical equations rather than individual pixels. This allows for scalability without loss of quality. When it comes to printing, vector graphics can be resized to any dimension without becoming pixelated, ensuring high-quality output.
- Editability: .ai files preserve the layers, shapes, and other design elements, making it easy to edit and modify the artwork as needed before sending it to the printer. This is particularly important when adjustments or corrections are required for the print version.
- Color Management: Illustrator allows for precise color control and consistency, which is crucial for achieving accurate and vibrant prints. It supports various color modes and profiles, ensuring that the intended colors are preserved in the final print.
- Fonts and Text Handling: When you create a design in Illustrator, you can convert fonts to outlines, ensuring that the printer will not have any font-related issues when opening the file.
Supported File Formats
Please note this is not the preferred file format, we might not be able to edit them, it could also result in low resolution and other printing problems.
• Adobe Photoshop CC (300 DPI or higher; .psd, .jpeg or. tiff)
• Adobe Acrobat PDF (.pdf)
CMYK and Pantone Colors
Our presses support CMYK mode only. If you provide us with RGB images, they will need to be converted to CMYK, which may result in significant color variations.
Color variations can be concerning, if color is extremely important to you, please order a physical proof. This allows you to preview the final appearance of your print labels before we proceed with production. By doing so, you can confirm that the colors meet your expectations and make any necessary adjustments if needed.
Additionally, if you include Pantone colors in your design, please be aware that they will be converted to their CMYK equivalents during the printing process.
We want your labels to turn out exactly as you envision them, If you are not sure or want to see more color options, you can request a custom Color Proof, or a Pantone Book Chart, please contact us at info@just1label.com for more information.
Vector vs. Raster
A vector file and a raster file are two different types of digital image files, each with its own characteristics and uses. In our case, we prefer using vector files over raster file, click here to read more.
Guidelines and Bleeds
You can download templates here.
- If the size you want isn’t in the template list, or if you need a unique shaped cut, just reach out to us. To get a new custom shape or size, you’ll need to order a new die, which comes with a fee of $199 each time you order a new template.
Now, let’s talk about the helpful RED and BLUE lines you see on our template. The red line is the Trim Line, indicating where the label will be cut during the production process. Anything outside this line will be removed. On the other hand, the blue line is the Artwork Safe Line. It ensures that all the important elements within it will stay intact.
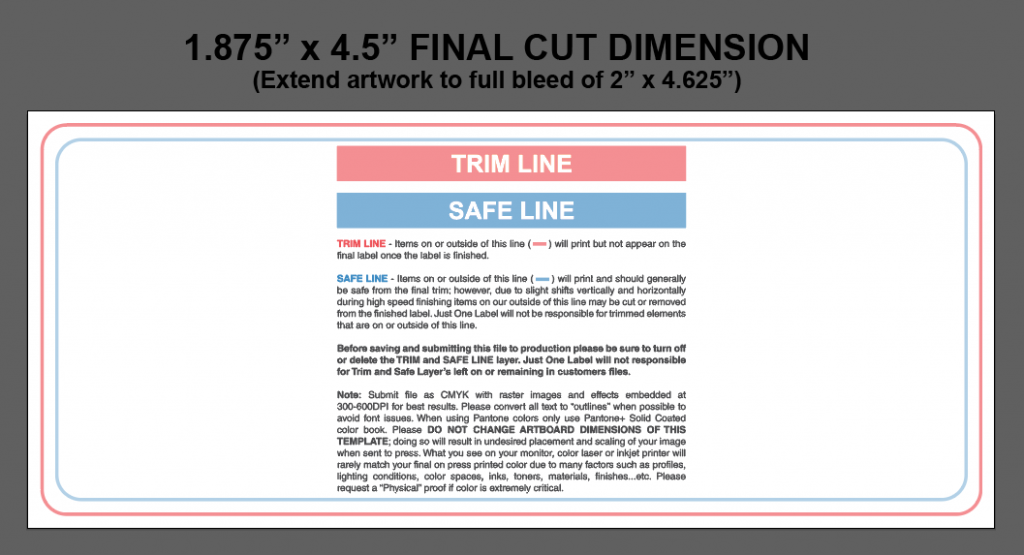
Between these two lines, we have a buffer space. This is there to account for any slight machine movements that can happen during high-speed cutting. Don’t worry though, everything within the blue line is protected and won’t get cut.
Because of the cutting machine operates at high speeds, occasionally it can lead to thin white lines at the edges of the label if the artwork is positioned right up to the art board. To prevent this issue, extend your background artwork beyond the Trim Line. We call this “Full Bleed.” By doing so you are ensured that no white lines will show up at the edge of your label, even if there’s a slight shift during cutting.
So remember to give your artwork some extra breathing room by extending the background beyond the Trim Line. This simple step will help you avoid any unwanted white lining problems and ensure a clean and polished result for your printed materials.
Lastly, please DO NOT change the art board dimensions when setting up your file. Modifying the art board size can lead to unintended consequences, such as improper placement and scaling of your design.
White Ink & Special Materials
White ink can be applied with special materials like metallic silver poly and clear poly. Include a “White Mask” to tell us where you want white ink to print. click here to read more.
Can You Help Me with My Artwork Files?
Absolutely! We are happy to help! Please visit Graphic Requirement and Graphic Fees for detail.